2023.09.27에 마무리된 프로젝트
2023.12.22에 비공개로 작성한거 티스토리에 올리기 위해 복붙했어요 그럼 시작할게요
KoBERT 이용해서 7가지 감정 분류하기(딥러닝) - 1을 보면 모델까지는 만들었네
계획은 모델까지 만들면 그 당시 멜론 TOP100 음악 리스트를 크롤링해와서 입력한 문장의 감정과 일치하는 노래를 추천하게끔 하는 거였다
그렇기 위해선 크롤링을 해야 됐는데
• 크롤링
import pandas as pd
from selenium import webdriver #웹 브라우저 자동화
import time
from tqdm.notebook import tqdm
#웹브라우저 설정
path = "chromedriver.exe"
driver = webdriver.Chrome(path)
driver.get("https://www.melon.com/chart/index.htm")
time.sleep(2) #2초간 정지
#이 코드를 실행하면 멜론 창이 뜨면서 Chrome이 자동화된 테스트 소프트웨어에 의해 제어되고 있다고 뜸 -> 성공from selenium.webdriver.common.by import By
title=driver.find_elements(By.CLASS_NAME, 'ellipsis.rank01')
#노래 제목
title2=[]
for i in title:
title2.append(i.text)#노래 가수
singer=driver.find_elements(By.CLASS_NAME, 'ellipsis.rank02')
singer2=[]
for i in singer:
singer2.append(i.text)songTagList = driver.find_elements(By.ID,'lst50')
songTagList2 = driver.find_elements(By.ID,'lst100')
number50=[]
number100=[]
for i in songTagList:
number50.append(i.get_attribute('data-song-no'))
for i in songTagList2:
number100.append(i.get_attribute('data-song-no'))
LYRIC=[]
for i in number50:
    driver.get("https://www.melon.com/song/detail.htm?songId=" + i)
    lyric=driver.find_element(By.CLASS_NAME,"lyric")
    LYRIC.append(lyric.text)

for j in number100:
    driver.get("https://www.melon.com/song/detail.htm?songId=" + j)
    lyric=driver.find_element(By.CLASS_NAME,"lyric")
    LYRIC.append(lyric.text)
LYRIC2=[]
for i in LYRIC:
LYRIC2.append(i.replace("\n",""))
data=pd.DataFrame({"제목":title2,"가수":singer2,"가사":LYRIC2})
data.to_csv("멜론 크롤링_수정.csv")
data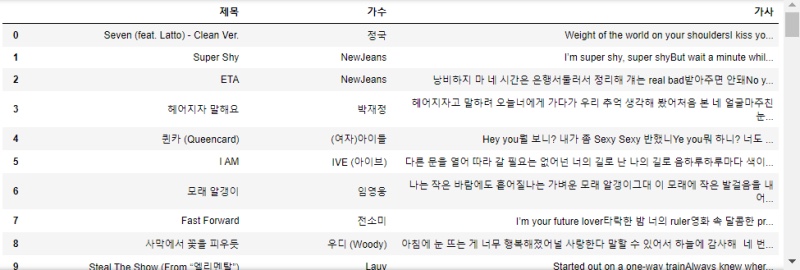
크롤링 완료!
하나의 예시를 들자면
data = pd.read_csv('멜론 크롤링_수정.csv')
data['가사'][33]
• 코랩으로 진행했던 모델 저장해서 파이썬에 불러오기
이게 생각지못한 큰 난관이었는데.. 왜냐? 모델 저장이 안돼!!!
구글링해도 해결이 안돼!!! 딥러닝 관련 정보는 구글링해도 많이 나오지도 않고.. 종류가 많아서 그런가 해결도 쉽지 않다
프로젝트 3개월 뒤에 작성하는거라.. 기억이 잘 안 나지만 더듬더듬 잘 써볼게용
from transformers import TFBertForSequenceClassification
model = TFBertForSequenceClassification.from_pretrained("saving_folder")
이 코드 전에 saving_folder 만들어서 코랩에서 따로 모델을 저장해줘야 한다
코랩에서 모델 돌리면

옆에 이렇게 모델이 따로 저장되기 때문에 그 모델을 saving_folder에 옮겨줘야한다(모델뿐만 아니라 다른 것도 넣어줘야 했던 걸로 기억함)
막상 방법을 알고 진행하면 단순한 과정인데 딥러닝의 단점은 막히면 답이 없다
senti_dict = {0:"분노", 1:"슬픔", 2:"공포", 3:"역겨움", 4:"중립", 5:"놀라움", 6:"행복"}
#노래와 감정 연결하기
def get_senti_music(new_sentence) :
    input_id = tokenizer.encode(new_sentence, max_length=max_seq_len, pad_to_max_length=True)

    padding_count = input_id.count(tokenizer.pad_token_id)
    attention_mask = [1] * (max_seq_len - padding_count) + [0] * padding_count
    token_type_id = [0] * max_seq_len

    input_ids = np.array([input_id])
    attention_masks = np.array([attention_mask])
    token_type_ids = np.array([token_type_id])

    encoded_input = [input_ids, attention_masks, token_type_ids]
    score = list(model.predict(encoded_input)[0][0])

    result = score.index(max(score))
    senti_result = senti_dict[result]
    good_music = str(music[music['kolabel']==senti_result].sample()['musicname'])
    good_music = re.sub(r"[^가-힣]", "", good_music)
    return senti_result, good_music
music = pd.read_csv('musiclist.csv', encoding='cp949')
music.head(1)
get_senti_music("비가 너무 많이 와서 무서워")
• html을 이용해 웹페이지 제작
학교 웹프기 수업을 통해 배운 지식으로 html 제작했다
웹페이지 제작은 무에서 유를 창조하는 기분이라 재미있다
<sooktat.html>
<!DOCTYPE html>
<html lang="en">
<head>
    <meta charset="UTF-8">
    <link rel="stylesheet" href="{{ url_for('static', filename='sooktat.css') }}">
</head>
<body>
  <div id="center" style="position: relative; left: 580px; top: 45px;">
      <div id="box1">
          <h1 style="color:gray; font-weight:100;">emotisong</h1>
        <div id="box2" style="position: relative; left: 16px; top: 16px;">
        <script>
            var date = new Date().toLocaleDateString();
                document.write(date);
            </script>

    <div id="box2" style="position: relative; left: 126px; top: -24px;">
        <script>
            let today = new Date();
            document.write(today.toLocaleTimeString() + '<br>');
            </script>
         </div>

     <div id="box3" style="position: relative; left: 255px; top: -54px;">
        82%
         </div>
     </div>


     <form method="post" action="/view">
         <input type="text" name="name" placeholder="이름을 입력하세요" style="position: relative; left: -6px; top: 45px;">
         <textarea name="content" rows="9" cols="40" placeholder="당신의 하루는 어떠셨나요? 여러분의 감정을 분석해서 어울리는 노래를 추천해드릴게요.(200자 이내)" style="position: relative; left: -2px; top: 70px; text-align: center;" ></textarea>
         <input type="submit" value="보내기" style="position: relative; left: -5px; top: 82px;">

          </form>

          <div id="box6" style="position: relative; left: 18px; top: 100px;">
            <br><br>  당신의 감정은 {{emotion}} 이며, 추천하는 곡은 {{song}}입니다
          </div>

          <br><br><br><br><br><p style="font-size: 13px; color:gray"> SOOK-TAT 4기</p>

     </div>
     <div id="box4" style="position: relative; left: 0px; top: -40px;">
         </div>

    <div id="box5" style="position: relative; left: 153px; top: -95px;">
         </div>

    </div>

</body>
</html>
<sooktat.css>
#center {
text-align: center;
}


#box1 { /*폰 바탕*/
    text-align: center;
    width: 350px;
    height: 600px;
    background-color: #F5F5F5;
    border-radius: 40px 40px 40px 40px;
    box-shadow: 9px 5px 6px 5px gray;
}

#box2 { /*날짜와 시간*/
    width: 115px;
    height: 25px;
    background-color: #D3D3D3;
    border-radius: 40px 40px 40px 40px;
    border-style: outset;
}

#box3 { /*배터리 잔량*/
    width: 50px;
    height: 25px;
    background-color: #D3D3D3;
    border-radius: 40px 40px 40px 40px;
    border-style: outset;
}

#box4 { /*하단바 바탕*/
    width: 350px;
    height: 60px;
    background-color: #D3D3D3;
    border-radius: 0px 0px 40px 40px;
}

#box5 { /*하단바 버튼*/
    width: 45px;
    height: 45px;
    background-color: white;
    border-radius:40px 40px 40px 40px;
    border-style: ridge;
}

#box6 { /*결과 나오는 창*/
    width: 311px;
    height: 120px;
    background-color: white;
    border: 1px solid gray;

}
• flask로 웹페이지 연결
우선 코드 전에 폴더를 또 만들어서 html 파일이랑 css 파일을 따로 넣어줘야 flask에 적용이 된다
두 파일을 만들어놓자

from flask import Flask, render_template, request

app = Flask(__name__)

@app.route('/')
def formpage():
    return render_template('sooktat.html')
@app.route('/view',methods=['post'])
def view():
content = request.form['content']
recom = get_senti_music(content)
emotion = recom[0]
song = recom[1]
return render_template('sooktat2.html', emotion=emotion, song=song)
if __name__ == "__main__":
app.run()결과!!!!!!!!!!!!!!!!!!!!!!!!!!!!!!!
확실히 머신러닝보다 딥러닝이 재밌긴한데 딥러닝은 그만큼 따라오는 고통이 어마어마하다
왜냐면 오류에 부딪히면 해결이 안돼 정보도 없어 오류 메세지 해석도 못해
아쉬운 점은 당시 TOP100을 임영웅님이 섭렵하셔서 결과가 거의 임영웅 노래다 ㅋㅋ
무튼 이 프로젝트는 부족한 경험과 지식으로 부딪혀보자 했던 거라 이전 프로젝트들과 비교 안 될정도로 뿌듯했다
'프로젝트' 카테고리의 다른 글
| NER(Named Entity Recognition)모델을 이용한 챗봇캘린더 (0) | 2024.07.29 |
|---|---|
| [R분석] 경시적 자료 분석을 통해 기업 재무 성과 조사(랜덤절편모형, 랜덤절편랜덤기울기모형, AR(1)모형) (0) | 2024.07.29 |
| 저소득 노인을 위한 천 원의 급식소 입지 선정 프로젝트(EDA, 전처리, AHP분석, 태블로/ 데이터분석을 처음한다면 참고하세요) (4) | 2024.01.13 |
| KoBERT 이용해서 7가지 감정 분류하기(KoBERT 모델 오류 이 글보면 해결 가능) - 1 (2) | 2024.01.13 |